TCP Socket Router 예제를 통한 Electron Application 작성방법에 대한 연재가 완료되었습니다.
Electron + Vue.js 애플리케이션 만들기
1. Electron 프로젝트 생성하기(Create Electron Application Project)
2. Electron IPC 통신(Electron Architecture, IPC Main/IPC Renderer)
3. TCP Router 기능 구현(Implements TCP Router Communication)
5. 환경설정 구현하기(Preferences Window)
6. 메뉴 사용하기(Application Menu & Context Menu)
7. 시스템 트레이 사용 및 창 최소화(System Tray & Minimize to Tray)
8. Bootstrap Vue와 Font Awesome 사용하기(Using Bootstrap Vue & Font Awesome)
9. Dark Layout과 Frameless Window(Dark Layout & Frameless Window)
10. 빌드 및 배포, 자동 업데이트(Build, Auto Updater)
이번 포스트에서는 빌드하여 배포하는 방법과 자동 업데이트 기능을 구현합니다.
Build 값 설정하기
제품 정보 수정하기
package.json 파일에 제품명과 버전, 작성자 및 빌드 옵션을 적절하게 수정합니다.
{
  "name": "kr.ejsoft.socket.router",		// 윈도우의 경우 설치 후 프로그램 경로로 사용됩니다.
  "version": "0.0.1",		// 버전 : 추후 자동업데이트와 연관됩니다.
  "author": "EJSoft™",		// 만든사람 : 만든 사람 정보를 입력합니다.
  "description": "TCP Socket Router Application",		// 제품 설명
  "license": "",
  "main": "./dist/electron/main.js",
  "scripts": {
  ......(중간생략)......
    "publish": "node .electron-vue/build.js && cross-env GH_TOKEN=[Github Token] electron-builder --publish always",
  ......(중간생략)......
  },
  "build": {
    "productName": "TCP Socket Router",		// 제품이름 : 빌드 후 결과물 파일명의 기준이됩니다.
    "appId": "kr.ejsoft.socket.router",
    "publish": {			// 배포위치 : 추후 배포 및 자동 업데이트의 기준이 됩니다.
      "provider": "github",
      "owner": "[Github User]",
      "repo": "[Github Repository]",
      "token": "[Github Token]"		// 여기에 설정하면 경고를 출력합니다. private 저장소가 아닐 경우에는 명령에서 GH_TOKEN을 사용하십시오.
    },
    "directories": {
      "output": "build"
    },
    "files": [
      "dist/electron/**/*"
    ],
    "extraResources": [
      {
        "from": "static",
        "to": "static"
      }
    ],
    "dmg": {
      "contents": [
        {
          "x": 410,
          "y": 150,
          "type": "link",
          "path": "/Applications"
        },
        {
          "x": 130,
          "y": 150,
          "type": "file"
        }
      ]
    },
    "mac": {
      "icon": "build/icons/icon.icns"
    },
    "win": {
      "icon": "build/icons/icon.ico",
      "target": [		// 빌드 옵션 : 32bit, 64bit 지원을 위해 추가합니다.
        {
          "target": "nsis",
          "arch": [
            "x64",
            "ia32"
          ]
        }
      ]
    },
    "linux": {
      "icon": "build/icons"
    }
  },

  ......(중간생략)......
}
Github 정보 설정하기
Github Token 발급 받기
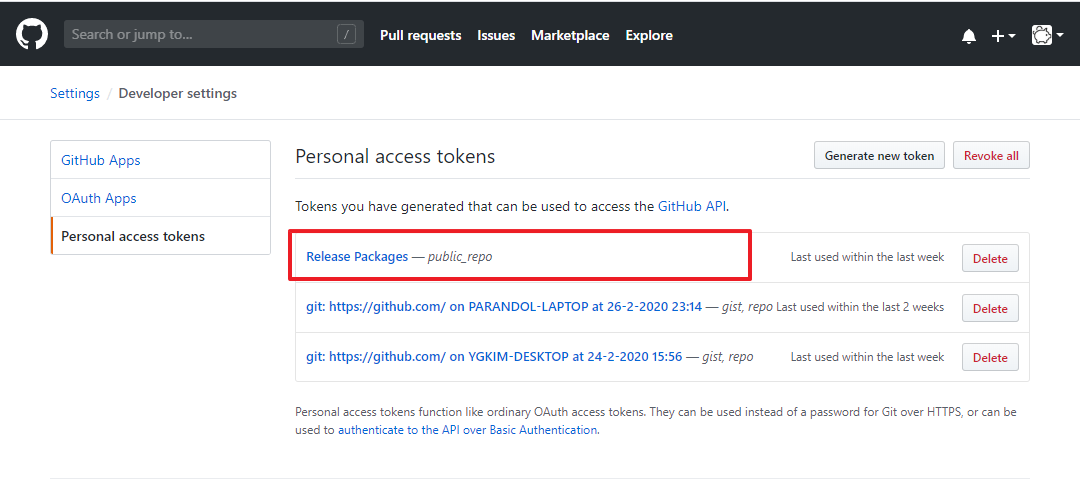
Github > Settings > Profile > Developer settings > Personal access tokens(https://github.com/settings/tokens)로 들어가서 Generate new token 버튼을 클릭하고 public_repo 옵션을 선택한 다음 하단의 토큰 발급 버튼을 클릭합니다. 토큰 목록에 생성된 문자열을 복사합니다. 이 문자열을 추후 확인할 수 없으니 반드시 다른 곳에 잘 저장해 놓아야 합니다. 잃어버렸을 경우에는 삭제 후 재발급받아야 합니다.
처음 생성했을 경우 아래 그림의 붉은 박스에 토큰 문자열이 보입니다. 아래 그림은 발급 후 다시 페이지 접근 후에 캡처 한 그림입니다.

Github 저장소 정보 설정
package.json의 build에 publish 정보와 배포 명령에 GH_TOKEN을 추가합니다.
  ......(상단생략)......
  "scripts": {
  ......(중간생략)......
    "publish": "node .electron-vue/build.js && cross-env GH_TOKEN=[Github 토큰] electron-builder --publish always",
  ......(중간생략)......
  "build" : {
    "publish": {
      "provider": "github",
      "owner": "저장소 소유자",
      "repo": "저장소 경로명"
    },
  ......(이하생략)......
S3 사용하기
package.json의 build에 publish 정보를 추가합니다.
  ......(상단생략)......
  "build" : {
    "publish": {
        "provider": "s3",
        "bucket": "bucketName",
        "acl": "public-read",
	    "path": `desktop/macos`,
        "region": 'us-east-1',
    },
  ......(이하생략)......
빌드 및 배포하기
다음 명령을 수행하여 빌드와 배포를 진행합니다.
npm run publish자동으로 빌드된 다음 성공하면 Github에 자동으로 파일을 업로드합니다. 이때 Github의 해당 버전의 경로가 없을 경우에는 draft 상태로 자동 생성되어 업로드됩니다. 이미 존재하는 경우 draft상태에서만 자동으로 업로드가 가능하며 release 상태나 pre-release 상태에서는 자동 업로드되지 않습니다. 이런 경우에는 직접 빌드 후 파일을 업로드해야 합니다.

release 탭(아래 붉은 박스)에서 파일 업로드 확인이 가능합니다.

자동으로 Draft 상태로 해당 버전이 업로드된 화면입니다.

버전을 클릭하면 파일 및 상태를 관리할 수 있습니다.

업데이트 기능 구현
자동 업데이트 코드 추가하기
업데이트 초기화
/src/main/index.js를 아래와 같이 수정합니다.
......(중간생략)......

import { autoUpdater } from 'electron-updater'

let mainWindow = null;
let mainContents;
function init() {
    mainWindow = MainWindow.create();
    mainWindow.on('closed', () => {
        mainWindow = null
    });

    mainContents = mainWindow.webContents

    if (process.env.NODE_ENV === 'production') autoUpdater.checkForUpdates()
}


......(중간생략)......
autoUpdater.on('update-downloaded', () => {
    autoUpdater.quitAndInstall()
})

......(하단생략)...
자동업데이트 확장
아래의 코드를 응용하여 화면에 자동업데이트 화면을 생성할 수 있습니다.
autoUpdater.on('update-available', function () {
    console.log('A new update is available')
    // mainContents.send('updater-message', 'A new update is available')
})
autoUpdater.on('checking-for-update', function () {
    console.log('Checking-for-update')
    // mainContents.send('updater-message', 'Checking for Update..')
})
autoUpdater.on('error', function (error) {
    console.log('error')
    console.error(error)
    // mainContents.send('updater-message', 'Got Error')
})
autoUpdater.on('download-progress', function (bytesPerSecond, percent, total, transferred) {
    console.log(`${bytesPerSecond}, ${percent}, ${total}, ${transferred}`)
    // mainContents.send('updater-message', `download progress : ${bytesPerSecond}, ${percent}, ${total}, ${transferred}`)
})
autoUpdater.on('update-downloaded', function (event) {
    console.log('update-downloaded')
    console.log(event)
    autoUpdater.quitAndInstall()
    // mainContents.send('updater-message', 'update-downloaded')
})

autoUpdater.on('update-not-available', function () {
    console.log('update-not-available')
    // mainContents.send('updater-message', 'update-not-available')
})
업데이트 모듈화 하기
업데이트 처리 모듈화
autoUpdater.checkForUpdates()를 자동으로 호출하여 업데이트를 확인할 수 있는데 본 프로젝트에서는 GUI에서 사용자의 선택에 따라 처리하도록 수정하였습니다. 아래의 코드를 적절하게 수정하여 필요에 맞게 사용하면 됩니다.
import { ipcMain, app } from 'electron'

import { autoUpdater, UpdateInfo, VersionInfo, UpdateCheckResult} from "electron-updater"

if (process.env.NODE_ENV !== 'production') {
    const path = require("path");

    //개발환경일경우 설정파일이 없어서 오류 index.js와 같은 폴더에 앱업데이트 설정을 넣어둬 해결
    autoUpdater.updateConfigPath = path.join(__dirname, '../dev-app-update.yml');
}

// https://www.electron.build/auto-update
export default (() => {
    class AppUpdater {
        constructor(window) {
            this.window = window;

            const log = require("electron-log")
            log.transports.file.level = "debug"

            autoUpdater.logger = log

            log.info("AutoUpdater config : " + autoUpdater.updateConfigPath);

            this.bindEvents();

            // autoUpdater.checkForUpdates()
            // autoUpdater.checkForUpdatesAndNotify()
            // autoUpdater.logger.transports.file.level = "info"
        }

        bindEvents() {
            // 사용자가 업데이트 확인을 요청했을 경우
            ipcMain.on("update-check-now", (event, data) => {
                // console.log("update-check-now..................." + JSON.stringify(data))
                let {download} = data;
                download = (typeof download === "undefined") ? true : download;
                // console.log("update-check-now..................." + download)
                autoUpdater.autoDownload = download;
                // try {
                    autoUpdater.checkForUpdates();
                // } catch(error) {
                //     log.error(error);
                // }
            });
            // 사용자가 업데이트 파일의 다운로드 요청했을 경우
            ipcMain.on("update-download-now", (event, data) => {
                // console.log("update-download-now...................")
                // try {
                    autoUpdater.downloadUpdate();
                // } catch(error) {
                //     log.error(error);
                // }
            });
            // 사용자가 업데이트 지금 설치를 요청했을 경우
            ipcMain.on("update-and-install-now", (event, data) => {
                // console.log("update-and-install-now...................")
                // try {
                    autoUpdater.quitAndInstall();
                // } catch(error) {
                //     log.error(error);
                // }
            });
            // 사용자가 프로그램 종료를 요청했을 경우
            ipcMain.on("update-quit-now", (event, data) => {
                // console.log("update-quit-now...................")
                app.isQuiting = true;
                app.quit();
                app.exit();
            });
            // 사용자가 업데이트 나중에 하기를 했을 경우
            ipcMain.on("update-quit-later", (event, data) => {
                // console.log("update-quit-later...................")
                // autoUpdater.checkForUpdates();
            });

            const _this = this;
            // 업데이트 여부 확인 시작
            autoUpdater.on('checking-for-update', function() {
                // console.log('Checking-for-update')
                _this.window.webContents.send('updater-message', {type : 'checking-for-update'})
            })
            // 업데이트가 없음
            autoUpdater.on('update-not-available', function() {
                // console.log('update-not-available')
                _this.window.webContents.send('updater-message', {type : 'update-not-available'})
            })
            // 업데이트가 있음
            autoUpdater.on('update-available', function(info) {
                // console.log('A new update is available, ' + JSON.stringify(info))
                _this.window.webContents.send('updater-message', {type : 'update-available', info})
            })
            // 업데이트 다운로드 진행중
            autoUpdater.on('download-progress', function(progress) {
                // console.log('download-progress... ' + JSON.stringify(progress))
                _this.window.webContents.send('updater-message', {type : 'download-progress', progress})
            })
            // 업데이트 파일 다운로드가 완료됨
            autoUpdater.on('update-downloaded', function(info) {
                // console.log('update-downloaded, ' + JSON.stringify(info))
                _this.window.webContents.send('updater-message', {type : 'update-downloaded', info})
            })
            // 오류가 발생하였음
            autoUpdater.on('error', function(error) {
                // console.log('error')
                console.error(error)
                log.error(error);
                _this.window.webContents.send('updater-message', {type : 'update-error', error})
            })
        }
    }

    return {
        init(window) {
            if(!AppUpdater.instance) {
                AppUpdater.instance = new AppUpdater(window);
            }
            return AppUpdater.instance;
        }
    };
})();
업데이트 처리 초기화 코드 적용
애플리케이션이 초기화되고 메인 창이 생성된 후에 업데이트 코드를 삽입합니다.
......(상단 생략)......
function init() {
    mainWindow = MainWindow.create();
    mainWindow.on('closed', () => {
        mainWindow = null
    });

    AppUpdater.init(mainWindow)
}

app.on('ready', init)
......(하단 생략)......
업데이트 처리 GUI 구현
/src/renderer/components/UpdateToast.vue 파일을 아래와 같이 구현합니다.
<template>
<b-toast
id="update-toast"
variant="secondary"
toaster="b-toaster-top-right"
append-toast
no-auto-hide
:no-close-button="updateToastNoClose"
toast-class="toast-top"
:visible="visible"
>
<template v-slot:toast-title>
<div class="d-flex flex-grow-1 align-items-baseline">
<strong class="mr-auto">Update!</strong>
<small class="text-muted mr-2"></small>
</div>
</template>
{{ updateStateMessage }}
<b-progress
:max="updateTotalBytes"
show-progress
animated
variant="success"
v-if="updateStep >= 3"
>
<b-progress-bar :value="updateDownloadBytes">
<span class="text-white">
{{ updateDownloadBytes | prettyBytes }}
/ {{ updateTotalBytes | prettyBytes }}
</span>
</b-progress-bar>
</b-progress>
<b-container fluid class="text-center m-1 mt-2" v-if="updateStep === 1 && !autoCheck">
<b-button @click="handleCheckUpdateNow" variant="primary" size="sm">업데이트 확인</b-button>
</b-container>
<b-container fluid class="text-center m-1 mt-2" v-if="updateStep === 2 && !autoDownload">
<b-button @click="handleDownloadNow" variant="primary" size="sm">업데이트 다운로드</b-button>
</b-container>
<b-container fluid class="text-center m-1 mt-2" v-if="updateStep === 4 && !autoInstall">
<b-button @click="handleUpdateToast(1)" variant="primary" size="sm">지금 설치 및 재시작</b-button>
<b-button @click="handleUpdateToast(2)" variant="secondary" size="sm">지금 종료</b-button>
<b-button @click="handleUpdateToast(3)" variant="info" size="sm">나중에 종료</b-button>
</b-container>
</b-toast>
</template>
<script>
import { ipcRenderer, remote } from 'electron';
export default {
name: 'update-toast',
components: {
},
props: {
autoCheck :{
type: Boolean,
default: false
},
autoDownload :{
type: Boolean,
default: false
},
autoInstall : {
type: Boolean,
default: false
},
},
data() {
return {
visible : false,
updateStateMessage: "",
updateToastNoClose: false,
updateDownloadBytes: 5,
updateTotalBytes: 10,
updateStep: 1,
}
},
created() {
// this.$bvToast.show('update-toast');
if(!this.autoCheck){
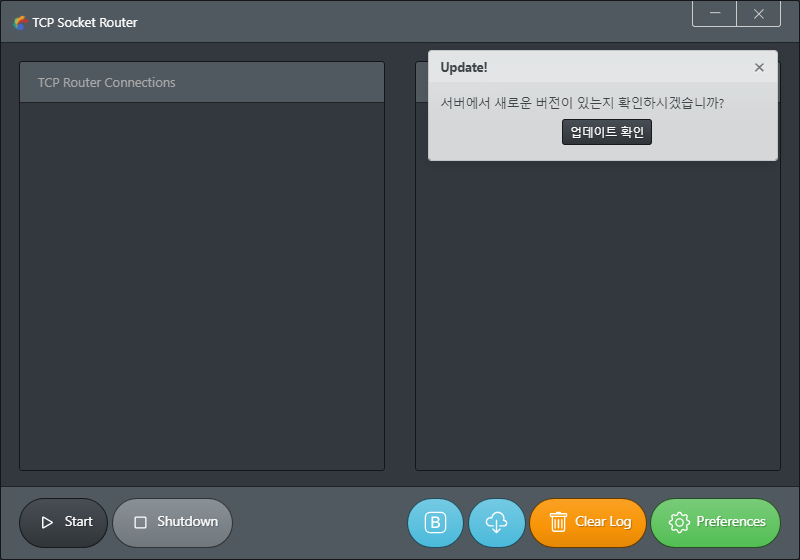
this.updateStateMessage = "서버에서 신규 버전이 있는지 확인하시겠습니까?";
this.visible = true;
}
// ipcRenderer.send("update-check-now", "");
},
mounted() {
ipcRenderer.on("updater-message", (event, args) => {
// console.log("updater-message");
console.log(args);
switch(args.type) {
case "checking-for-update":
this.updateStateMessage = "서버에서 신규 버전이 있는지 확인 중입니다.";
this.updateToastNoClose = false;
this.visible = true;
break;
case "update-not-available":
this.updateStateMessage = "최신 버전의 애플리케이션을 사용 중입니다.";
this.updateToastNoClose = false;
this.visible = true;
setTimeout(() => {
this.$bvToast.hide('update-toast');
}, 3000);
break;
case "update-available":
const {releaseName} = args.info;
this.updateStateMessage = "서버에서 신규 버전(" + releaseName + ")을 찾았습니다.";
this.updateStep = 2;
// {
// "version":"9.0.1",
// "files":[
// {"url":"TCP-Socket-Router-Setup-9.0.1.exe"
// ,"sha512":"XX8cFZW93AiFmw85fRdrwLIXZwBfN5ezxdFbgjGE+zlTrjmdl2asuyuytP2qrpEHJD0hYl3taRxb5DApPq6b1g=="
// ,"size":111068833}
// ]
// ,"path":"TCP-Socket-Router-Setup-9.0.1.exe"
// ,"sha512":"XX8cFZW93AiFmw85fRdrwLIXZwBfN5ezxdFbgjGE+zlTrjmdl2asuyuytP2qrpEHJD0hYl3taRxb5DApPq6b1g=="
// ,"releaseDate":"2020-03-06T05:56:54.284Z"
// ,"releaseName":"9.0.1"
// ,"releaseNotes":"No content."
// }
this.updateToastNoClose = false;
this.visible = true;
break;
case "download-progress":
const {bytesPerSecond, percent, total, transferred, delta} = args.progress;
this.updateStateMessage = "업데이트 파일을 다운로드(" + percent.toFixed(1) + "%) 중입니다.";
this.updateToastNoClose = true;
this.visible = true;
this.updateStep = 3;
this.updateDownloadBytes = transferred;
this.updateTotalBytes = total;
break;ㄴ
case "update-downloaded":
this.updateStateMessage = "모든 업데이트 파일을 다운로드하였습니다.";
this.updateToastNoClose = true;
this.visible = true;
this.updateStep = 4;
if(this.autoInstall) {
this.handleUpdateToast(1);
}
break;
case "update-error":
this.updateStateMessage = "에러: " + JSON.stringify(args.error);
this.updateToastNoClose = false;
this.visible = true;
// setTimeout(() => {
// this.$bvToast.hide('update-toast');
// }, 2000);
break;
}
});
if(this.autoCheck) {
this.handleCheckUpdateNow();
}
},
methods: {
handleDownloadNow() {
ipcRenderer.send("update-download-now", {});
},
handleCheckUpdateNow() {
ipcRenderer.send("update-check-now", {
download : this.autoDownload,
install : this.autoInstall
});
},
handleUpdateToast(actions) {
switch(actions) {
case 0 :
break;
case 1 :
console.log("Resart Now...");
ipcRenderer.send("update-and-install-now", "");
break;
case 2 :
console.log("Quit Now...");
ipcRenderer.send("update-quit-now", "");
break;
case 3 :
console.log("Quit Later...");
ipcRenderer.send("update-quit-later", "");
this.updateStateMessage = "";
this.updateToastNoClose = true;
this.visible = false;
break;
}
},
}
}
</script>
<style>
.b-toaster.b-toaster-top-right, .b-toaster.b-toaster-top-left, .b-toaster.b-toaster-top-center, .b-toaster.b-toaster-top-full {
top: 3rem;
}
.b-toaster.b-toaster-top-right, .b-toaster.b-toaster-top-full {
right: 1.5rem;
}
</style>업데이트 화면 미리 보기


연재를 마치며
지금까지 TCP Socket Router 애플리케이션 예제를 기반으로 Electron 기반 프로그램을 개발하는 과정에 대해서 알아보았습니다. 다소 설명이 부족한 부분은 추후에 시간이 나는 대로 추가하도록 하겠습니다.
이제까지 봐주신 여러분들 감사합니다.
더 좋은 글로 찾아뵙겠습니다.
참고자료
- electron-builder를 이용한 일렉트론 자동 업데이트 앱
https://github.com/ChangJoo-Park/little-electron-app - electron-builder 사용하기
https://github.com/SimulatedGREG/electron-vue/blob/master/docs/ko/using-electron-builder.md - How to create electron auto updates using private github repository?
https://stackoverflow.com/questions/58125516/how-to-create-electron-auto-updates-using-private-github-repository - Automated Deployments using CI
https://simulatedgreg.gitbooks.io/electron-vue/content/en/using-electron-builder.html#auto-updating - Electron을 이용한 데스크톱 앱 시작 시 각종 설정
https://jsongsong.tistory.com/51
- Auto Update
https://www.electron.build/auto-update
소스코드
본 포스트 관련 소스코드는 여기에서 다운로드 가능합니다.
'Development > Node.js, Vue.js, Electron.js' 카테고리의 다른 글
| [Vue+Firebase+Vuetify] 01. Firebase with Vue and Vuetify (0) | 2020.08.05 |
|---|---|
| D3.js Geo Map on Vue.js(D3.js를 이용하여 지도 그리기) (4) | 2020.04.21 |
| [TCP Socket Router #09] Dark Layout & Frameless Window (0) | 2020.03.04 |
| [TCP Socket Router #08] Using Bootstrap Vue, Font Awesome (0) | 2020.03.02 |
| [TCP Socket Router #07] System Tray & Minimize to Tray (0) | 2020.02.28 |