TCP Socket Router 예제를 통한 Electron Application 작성방법에 대한 연재가 완료되었습니다.
Electron + Vue.js 애플리케이션 만들기
1. Electron 프로젝트 생성하기(Create Electron Application Project)
2. Electron IPC 통신(Electron Architecture, IPC Main/IPC Renderer)
3. TCP Router 기능 구현(Implements TCP Router Communication)
5. 환경설정 구현하기(Preferences Window)
6. 메뉴 사용하기(Application Menu & Context Menu)
7. 시스템 트레이 사용 및 창 최소화(System Tray & Minimize to Tray)
8. Bootstrap Vue와 Font Awesome 사용하기(Using Bootstrap Vue & Font Awesome)
9. Dark Layout과 Frameless Window(Dark Layout & Frameless Window)
10. 빌드 및 배포, 자동 업데이트(Build, Auto Updater)
이번 포스트에서는 애플리케이션 메뉴와 콘텍스트 메뉴(오른쪽 마우스)를 사용하는 예제를 설명합니다.
메뉴 사용하기
애플리케이션 메뉴 넣기
/src/main/window/main-menu.js 파일을 신규로 생성하여 메뉴를 등록합니다. 템플릿을 먼저 정의한 후에 Menu.buildFromTemplate(template) 함수와 Menu.setApplicationMenu(appMenu) 함수를 사용하여 메뉴를 등록합니다. 메뉴를 등록하게 되면 모든 화면(환경설정 페이지 등)에서 같은 메뉴를 참조합니다. 맥킨토시(process.platform === "darwin")에서는 맨 왼쪽에 시스템 메뉴가 들어가므로 해당 메뉴를 추가로 정의해 줍니다. 일반적인 메뉴는 role 속성 지정만으로 메뉴 등록이 가능합니다.
import { app, Menu, BrowserWindow, dialog, clipboard } from "electron";
import TCPRouterLauncher from '../shared/tcp-router-launcher';

const path = require("path");
const isMac = process.platform === 'darwin'

function createMainMenu(window) {
    const template = [
        ...(isMac ? [{
            label: app.name,
            submenu: [
              { role: 'about' },
              { type: 'separator' },
              { role: 'services' },
              { type: 'separator' },
              { role: 'hide' },
              { role: 'hideothers' },
              { role: 'unhide' },
              { type: 'separator' },
              { role: 'quit' }
            ]
          }] : []),
          {
            label: 'File',
            submenu: [
                // { type : "separator" },
                {
                    label : "Preferences",
                    accelerator: 'CmdOrCtrl+P',
                    click : () => {
                        // console.log("Preference....");
                        if(app.preference) app.preference.show();
                    }
                },
                (!isMac ? { type : "separator" } : {visible:false}),
                (!isMac ? {
                    label : "Exit",
                    click : () => {
                        app.isQuiting = true;
                        app.quit();
                    }
                } : {visible:false}),
            ],
        },
        {
            label: 'Service',
            submenu: [
                {
                    label: 'Startup',
                    accelerator: 'CmdOrCtrl+S',
                    click: () => {
                        TCPRouterLauncher.getInstance().execute();
                    }
                },
                {
                    label: 'Shutdown',
                    accelerator: 'CmdOrCtrl+D',
                    click: () => {
                        TCPRouterLauncher.getInstance().shutdown();
                    }
                }
            ],
        },
        {
            label: 'Window',
            submenu: [
                {
                    role: "minimize"
                },
                {
                    label: 'Hide',
                    // accelerator: 'CmdOrCtrl+H',
                    click: (item, focusedWindow) => {
                        focusedWindow.hide();
                    }
                },
            ],
        },
        {
            label: 'Help',
            submenu: [
                { type : "separator" },
                {
                    label : "Toggle Developter Tools",
                    accelerator : process.platform === "darwin" ? "Alt+Command+I" : "Ctrl+Shift+I",
                    // role : "toggledevtools"
                    click : (item, focusedWindow) => {
                        if(focusedWindow) {
                            focusedWindow.toggleDevTools();
                        }
                    }
                }
            ],
        }
    ];

/*
    if(process.platform === "darwin") {
        template.unshift({
            label: app.getName(),
            submenu : [
                { role: "about" },
                { type: "separator" },
                {
                    label : "Preferences",
                    accelerator: 'CmdOrCtrl+P',
                    click : () => {
                        // console.log("Preference....");
                        if(app.preference) app.preference.show();
                    }
                },
                { type: "separator" },
                { role: "services", submenu: [] },
                { type: "separator" },
                { role: "hide" },
                { role: "hideothers" },
                { role: "unhide" },
                { type : "separator" },
                // { role: "quit" },
                {
                    label : "Quit",
                    accelerator: "CmdOrCtrl+Q",
                    click: () => {
                        app.isQuiting = true;
                        app.quit();
                    }
                }
            ]
        });
    } else {
        // template.unshift();
    }
*/
    const appMenu = Menu.buildFromTemplate(template);
    Menu.setApplicationMenu(appMenu);
}

export default createMainMenu;
/src/main/index.js의 init() 함수에서 메뉴를 등록합니다.
......(상단생략)......

import createMainMenu from './window/main-menu'

......(중간생략)......

let mainWindow = null;
function init() {
  mainWindow = MainWindow.create();
  mainWindow.on('closed', () => {
    mainWindow = null
  });

  createMainMenu(mainWindow);

  ......(이하생략)......
메뉴 화면

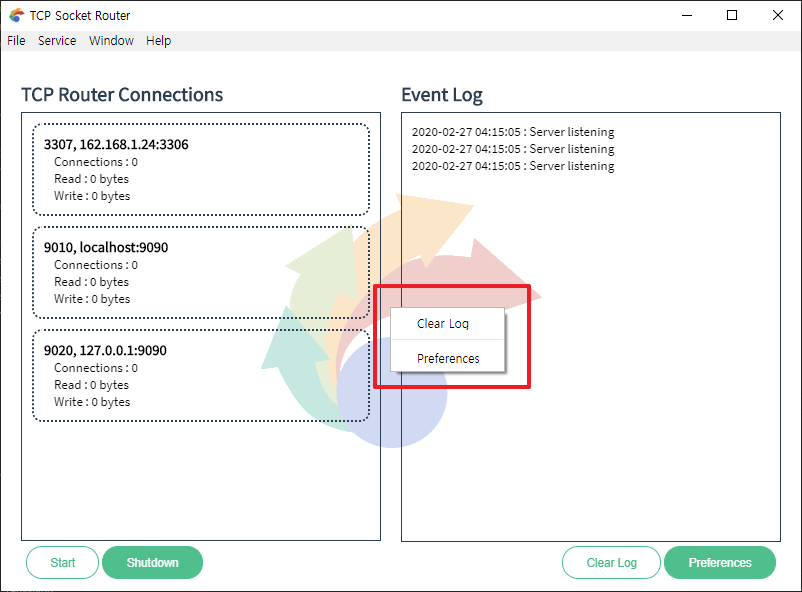
컨텍스트 메뉴 사용하기
renderer 프로세스에서는 remote 객체를 사용하여 콘텍스트 메뉴 사용이 가능합니다. 여기에서는 created 이벤트 처리에서 콘텍스트 메뉴를 정의하고 등록합니다. Electron 개발 가이드처럼 메뉴를 등록하면 모든 페이지(환경설정 페이지 포함)에서 콘텍스트 메뉴가 사용 가능합니다. 상황에 맞게 선택하여 사용하면 됩니다.
......(상단생략)......

import { ipcRenderer, remote } from 'electron'
const { Menu, MenuItem } = remote

// Electron 개발가이드 (아래와 같이 사용할 경우 모든 페이지에 적용됨)
// const menu = new Menu()
// menu.append(new MenuItem({ label: 'MenuItem1', click() { console.log('item 1 clicked') } }))
// menu.append(new MenuItem({ type: 'separator' }))
// menu.append(new MenuItem({ label: 'MenuItem2', type: 'checkbox', checked: true }))
// window.addEventListener('contextmenu', (e) => {
//   e.preventDefault()
//   menu.popup({ window: remote.getCurrentWindow() })
// }, false)

export default {
  name: 'main-page',
  components: { SystemInformation },
  data() {
    return {
      tcpRouterState: {},
      activeItem: {},
      selectedItem: null,
      selectedState: null,
      logs: [],
    }
  },
  created() {

    ......(중간생략)......

    // Context menu(Right button)
    const _this = this;
    const menu = new Menu()
    menu.append(new MenuItem({ label: 'Clear Log', click() { _this.handleClearLog(); } }))
    menu.append(new MenuItem({ type: 'separator' }))
    menu.append(new MenuItem({ label: 'Preferences', click() { _this.handlePreferences(); } }))
    window.addEventListener('contextmenu', (e) => {
      e.preventDefault()
      menu.popup({ window: remote.getCurrentWindow() })
    }, false)
  },
  mounted() {
  },
  ......(이하생략)......
콘텍스트 메뉴 화면
메뉴 비활성하기
일부 다이얼로그 페이지에서는 메뉴가 필요 없을 때가 있습니다. 위에서 설명한 Menu.setApplicationMenu() 함수로 메뉴를 등록하게 되면 모든 다이얼로그에서 메뉴가 보입니다. 창의 속성에 메뉴를 null로 지정하여 메뉴를 숨길 수 있습니다.
/src/main/window/preferences-window.js 에서 창을 생성할 때 window.setMenu(null)를 추가하여 메뉴를 숨깁니다.
......(상단생략)......
this.prefsWindow = new BrowserWindow(style);

......(중간생략)......

// 아래와 같이 하면 메뉴를 숨길 수 있습니다.
this.prefsWindow.setMenu(null);

......(상단생략)......
메뉴 비활성화 화면

참고자료
소스코드
본 포스트 관련 소스코드는 여기에서 다운로드 가능합니다.
'Development > Node.js, Vue.js, Electron.js' 카테고리의 다른 글
| [TCP Socket Router #08] Using Bootstrap Vue, Font Awesome (0) | 2020.03.02 |
|---|---|
| [TCP Socket Router #07] System Tray & Minimize to Tray (0) | 2020.02.28 |
| [TCP Socket Router #05] Preferences Window (0) | 2020.02.27 |
| [TCP Socket Router #04] Main Window GUI (0) | 2020.02.26 |
| [TCP Socket Router #03] Implements TCP Router Communication (0) | 2020.02.25 |