페이스북이나 구글 계정 로그인을 사용하는 경우 아래와 같은 로그인 화면을 사용합니다. 현재까지의 로그인 페이지를 실제 업무에 활용하기는 다소 부족한 점이 많습니다. 이번 포스트에서는 OAuth2 Server의 로그인 화면 수정하는 방법에 대해서 설명합니다.
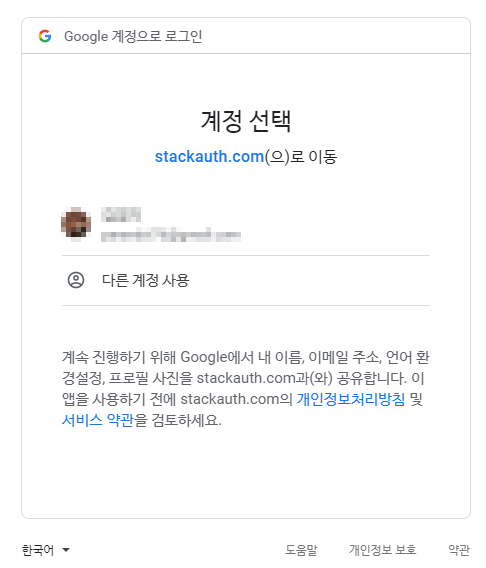
구글 로그인에서는 클라이언트 정보, 기존 계정정보, 다른 계정 사용, 권한 또는 공개범위를 표시합니다. 또한 다른 계정 사용을 클릭한 경우에는 계정 추가 및 신규 계정 발급까지도 지원합니다.

페이스북 로그인의 경우에도 클라이언트정보, 권한 및 공개범위, 로그인된 계정이 있을 경우에는 바로 표시하고 변경하고 싶을 경우에는 수정 링크를 제공하여 다른 계정도 사용할 수 있도록 지원합니다.
이제부터 구현하려는 기능은 페이스북이나 구글로그인과 최대한 비슷하게 구현하려고 합니다. 대략적인 기능은 아래와 같습니다. (본 포스트에서는 로그인 화면을 수정하는 부분만을 다룰 예정입니다. 계정 추가 등의 기능들은 페이지를 추가하는 부분이라 제외하겠습니다.)
- 클라이언트의 정보(로고, 이름 등)를 표시합니다.
- 클라이언트에서 요청한 권한(scope)을 표시합니다.
- 기존에 로그인했던 계정정보를 표시합니다.
- 다른 계정 사용도 가능하도록 합니다.
- 기존 계정 클릭시 암호 입력을 하게 하고 로그인 처리합니다.
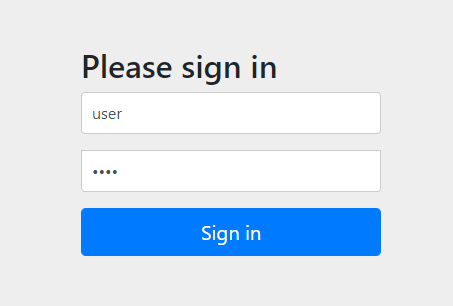
아래 그림은 Spring Security OAuth2의 기본 로그인 화면입니다. 업무에 사용하기에는 부족합니다.
사용자 로그인 페이지 변경하기
아래 작업시에 UserDetails, ClientDetails 구현 객체 및 관련 데이터베이스 테이블에 몇몇 속성/컬럼(아이콘, 이름, 설명 등)을 추가하였습니다. 단순한 작업으로 본 포스트에서는 코드를 넣지 않았습니다. 필요시 맨 하단의 소스코드를 참고하십시오.
프로젝트 생성
기존에 작업한 프로젝트에 Vue.js 프로젝트를 front로 사용하기 위하여 프로젝트에 통합합니다. 프로젝트 통합에 대한 부분은 본 블로그의 아래 링크를 참조하여 통합합니다. 본 포스트에서는 동일한 페이지인데 index.html과 login.html 2개의 다중 페이지를 사용하도록 구성하였습니다. 추후 index.html은 관리자 콘솔 등에 응용이 가능합니다.
Vue.js + Spring Boot 프로젝트 병합
Java 기반 프로젝트에서 Vue를 적용하는데 각각의 프로젝트의 개발환경이 달라 빠른 개발을 진행하기에 어려운 부분이 있습니다. 본 포스트에서는 Spring의 backend 개발의 장점과 Vue의 frontend 개발의 장점을..
parandol.tistory.com
Vue.js 다중 페이지 작업 설정
기본적으로 Vue.js 는 단일 페이지 어플리케이션(SPA)으로 동작합니다. OAuth Server를 작업하면서 관리콘솔과 로그인페이지로 각각 분리하여 작업할 필요가 있었습니다. 본 포스트에서는 간단하게 다중페이지 작..
parandol.tistory.com
WebSecurityConfigurerAdapter 수정
Spring Security OAuth2에서 사용하는 기본값을 아래와 같습니다. 사용자정의 로그인 페이지를 사용하기 위해서는 별도의 로그인 페이지 경로지정이 필요합니다.
    // Default configure(HttpSecurity)
    protected void configure(HttpSecurity http) throws Exception {
        http
            .authorizeRequests()
                .anyRequest().authenticated() // every request requires the user to be authenticated
                .and()
            .formLogin()                      // form based authentication is supported
                .and()
            .httpBasic();                     // HTTP Basic Authentication is supported
    }
로그인 페이지를 사용하기 위하여 WebSecurityConfigurerAdaper 클래스를 수정합니다. 아래에서는 사용자 정의 로그인 페이지와 로그인에 실패했을 경우의 주소를 지정하였습니다.
	// Custom Login Page
	@Override
	protected void configure(HttpSecurity http) throws Exception {
		http
			.csrf().disable()
			.authorizeRequests()
				.antMatchers("/", "/home", "/js/**", "/css/**", "/img/**", "/favicon.ico").permitAll()
				.antMatchers("/auth/**").permitAll()
				.anyRequest().authenticated()
			.and()
				.formLogin()
				.loginPage("/login").permitAll()
				.failureUrl("/login?failure")
//				.usernameParameter("id")			// 입력양식 이름이 username이 아니라면 별도로 설정
//				.passwordParameter("password");		// 입력양식 이름이 password가 아니라면 별도로 설정
			.and()
				.logout().permitAll()
			.and()
				.httpBasic()
			;
	}
/login 및 /auth/client 페이지 매핑
신규 Controller를 생성한 후에 다음과 같이 클라이언트 정보를 반환하는 페이지와 사용자정의 로그인 페이지를 생성합니다.
	@RequestMapping(value="/login", method=RequestMethod.GET)
	public ModelAndView login(HttpServletRequest request) {
		ModelAndView mav = new ModelAndView();
		mav.setViewName("login");
		return mav;
	}

	@RequestMapping(value="/auth/client", method=RequestMethod.GET)
	@ResponseBody
	public Map<String, Object> client(HttpServletRequest request) {
		HttpSession session = request.getSession();
		SavedRequest savedRequest = (SavedRequest) session.getAttribute("SPRING_SECURITY_SAVED_REQUEST");

		Map<String, Object> map = new HashMap<String, Object>();
		String clientId = null;
		if(savedRequest != null) {
			String[] clientIds = savedRequest.getParameterValues("client_id");
			clientId = (clientIds != null && clientIds.length > 0) ? clientIds[0]: null;

			logger.debug("Clientid in savedRequest : {}", clientId);				// Clientid : client
		}

		if(clientId != null && !"".equals(clientId)) {
			ClientDetails client = clientDetailsService.loadClientByClientId(clientId);
			if(client != null) {
				if(client instanceof OAuthClientDetails) {
					OAuthClientDetails details = (OAuthClientDetails) client;
					map.put("icon", details.getIcon());
					map.put("name", details.getName());
					map.put("desc", details.getDescription());
				} else {
					map.put("icon", null);
					map.put("name", client.getClientId());
					map.put("desc", client.getClientId());
				}

				String[] dbscope = OAuthUtil.toArray(client.getScope());
				String[] scope = savedRequest.getParameterValues("scope");

				map.put("authorization", merge(dbscope, scope));
				map.put("code", "200");
				map.put("message", "success");
			} else {
				map.put("code", "404");
				map.put("message", "client not found.");
			}
		} else {
			map.put("code", "403");
			map.put("message", "client id not found.");
		}

		return map;
	}

	private String[] merge(String[] all, String[] scope) {
		if(all == null || scope == null || all.length == 0 || scope.length == 0) return null;
		List<String> ret = new ArrayList<String>();
		for(String sco : scope) {
			for(String item : all) {
				if(sco.trim().equals(item.trim())) {
					ret.add(sco.trim());
					break;
				}
			}
		}
		return ret.toArray(new String[ret.size()]);
	}
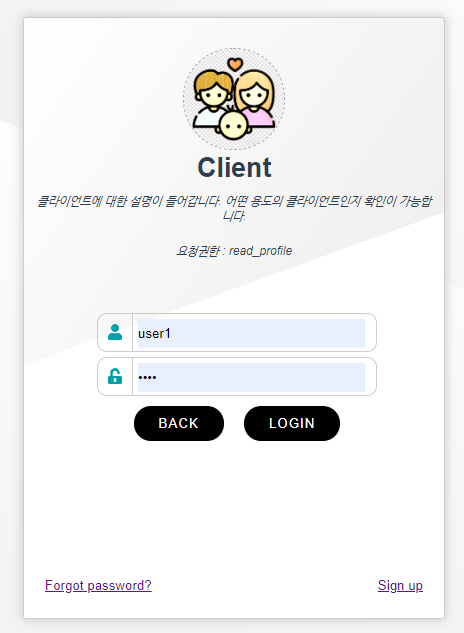
사용자 로그인 페이지 작업
사용자 로그인 페이지
사용자 정의 페이지 작업시 별도로 서버에서 파라미터명을 변경하지 않는다면 사용자 식별정보는 username으로 사용자 암호는 password로 정의되어야 합니다. 아래 코드에서는 별도의 수정을 하지 않고 username, password로 사용하였으며 post 방식으로 로그인을 처리하도록 하였습니다.
Vue.js 사용시 동적으로 Client의 정보를 출력을 위한 적당한 방법을 찾을 수 없었습니다. (서버에서 템플릿을 사용하여 처리하려 하였으니 Vue.js 특성상 모든 DOM의 내용들이 분리되는 관계로 템플릿 사용을 위한 각각의 지정자를 사용할 수 없었습니다.) 따라서, Axios의 Ajax 통신을 통하여 클라이언트의 정보를 읽어오도록 구현하였습니다.
<template>
  <div class="login-box">
    <div class="login-background"></div>
    <div class="login-contents">
      <div class="login-title">
        <img class="client-icon" :src="client.icon">
        <h1>{{ client.name }}</h1>
        <div class="login-desc">
          {{ client.desc }}
        </div>
        <div class="login-authorization">
          <span v-if="client.authorization.length > 0">요청권한 : </span>
          <span :key="auth.name" v-for="(auth, index) in client.authorization">
            <span v-if="index > 0">, {{ auth }}</span>
            <span v-else>{{ auth }}</span>
          </span>
        </div>
        <div class="login-failure" v-if="isFailurePage">
          <span>Failure : </span>
          <span>
            유효한 사용자를 찾을 수 없습니다.
          </span>
        </div>
      </div>
      <div style="position:relative;height:280px;">
      <transition name="slide-fade">
      <div class="login-form" v-if="!showInputs">
        <div class="user-element unlisted" @click="showInputForm(null);">
          <img class="user-icon" src="https://cdn.patchcdn.com/assets/layout/contribute/user-default.png">
          다른 id 사용
        </div>
      </div>
      </transition>
      <transition name="slide-fade">
      <div class="login-inputs" v-if="showInputs">
        <form action="/login" method="post">
          <div>
            <label-input type="text" name="username" icon="user" :value.sync="username">
              User Id
            </label-input>
            <label-input type="password" name="password" icon="unlock-alt" :value.sync="password">
              Password
            </label-input>
          </div>
          <div class="login-buttons">
            <button class="button-action" @click.stop.prevent="hideInputForm();">Back</button>
            <button class="button-action">Login</button>
          </div>
        </form>
      </div>
      </transition>
      </div>
      <div class="login-link">
        <div class="login-link-left"><router-link to="/forgot">Forgot password?</router-link></div>
        <div class="login-link-right"><router-link to="/signup">Sign up</router-link></div>
      </div>
    </div>
  </div>
</template>

<script>
import LabelInput from '@/components/LabelInput.vue'
const axios = require('axios');

export default {
  name: 'home',
  components: {
    LabelInput,
  },
  created : function() {
    // /login?failure 를 처리하기 위하여 현재 주소의 값을 확인하여 실패 이후 접근인지 확인합니다.
    let href = window.location.href;
    if(href.indexOf("?failure") >= 0) this.isFailurePage = true;
  },
  computed: {
    users : function() {
      return this.$store.getters.getUsers;
    }
  },
  data : function() {
    return {
      username : "",
      password : "",
      client: {},
      showInputs: false,
      isFailurePage: false,
    }
  },
  methods: {
    showInputForm : function(user) {
      if(user != null) {
        this.selectUser = user;
        this.username = user.userid;
        this.password = "";
      }
      this.showInputs = true;
    },
    hideInputForm : function() {
      this.showInputs = false;
      this.selectUser = null;
      this.username = "";
      this.password = "";
    },
    load: function() {
      // 클라이언트 정보를 Ajax를 통하여 읽어옵니다.
      axios.get("/auth/client", {
        timeout: 1000
      })
      .then( res => {
        if(res.data) {
          const data = res.data;
          if(data.code == "200") {
            this.client = res.data;
          } else {
            this.client = {
              icon: "https://tistory4.daumcdn.net/tistory/3410306/attach/97e22f962436482399d633524b87a6a6",
              name : "Error",
              desc : data.message,
              authorization: []
            };
          }
        }
      })
      .catch(
          error => {
            console.log("Error : " + error);
          }
      );
    }
  },
  mounted : function() {
    this.load();
  }
}
</script>

<style scoped>
.slide-fade-enter-active {
  transition: all .5s ease;
}
.slide-fade-leave-active {
  transition: all .5s cubic-bezier(1.0, 0.5, 0.8, 1.0);
}
.slide-fade-enter, .slide-fade-leave-to {
  transform: translateX(260px);
  opacity: 0;
}

.login-authorization, .login-failure {
  font-style: italic;
  font-size: 0.9em;
  padding: 10px;
}
.login-failure {
  color: #ff0000;
}
.login-buttons {
  margin: 10px;
}
.login-desc {
  font-style: italic;
  font-size: 0.9em;
  padding: 10px;
}
.button-action {
    padding: 10px 25px;
    margin: 0 10px;
    background-color: #000000;
    color: #ffffff;
    outline: none;
    border: none;
    letter-spacing: 1px;
    text-transform: uppercase;
    cursor: pointer;
    border-radius: 20px;
    transition: 0.3s all;
    -webkit-transition: 0.3s all;
    -o-transition: 0.3s all;
    -moz-transition: 0.3s all;
    -ms-transition: 0.3s all;
}
.button-action:hover {
    box-shadow: 0px 0px 8px 0px #000000;
}
.login-title {
  height:280px;
}
.login-title h1 {
  margin: 0;
}
.login-link {
  display: flex;
  flex-wrap: wrap;
  padding: 0 5%;
}
.login-link-left {
  box-sizing: border-box;
  text-align: left;
  flex-basis: 50%;
}
.login-link-right {
  text-align: right;
  flex-basis: 50%;
}
.client-icon {
  width: 100px;
  height: 100px;
  border: 1px dashed #aaaaaa;
  border-radius: 50px;
  background-color: #ffffff;
  margin: 30px 10px 0 10px;
}
.user-icon {
  width: 40px;
  height: 40px;
  margin: 5px;
  vertical-align: middle;
  border-radius: 20px;
  border: 1px dashed #aaaaaa;
}
.user-icon.big {
  width: 60px;
  height: 60px;
  margin: 5px;
  border-radius: 40px;
}
.login-wrap {
  position: relative;
}

.login-background {
  z-index: 10;
  position:absolute;
  transform-origin: top left;
  transform: rotate(-20deg);
  width: 200%;
  height: 100%;
  left: 0;
  top: 20%;
  /* border: 1px solid #000000; */
  margin-left: -30%;
  margin-top: 65%;
  /* background-image: linear-gradient(to bottom right, #ffffff , #dddddd); */
  background-color: #ffffff;
}

.login-contents {
  position:absolute;
  z-index: 100;
  width: 100%;
  height: 100%;
}
.login-form, .login-inputs {
  position: absolute;
  width: 300px;
  padding: 10px 15%;
}
.user-element {
  text-align: left;
  margin: 0.3em 0;
  border: 1px solid #bbbbbb;
  border-radius:6px;
  padding: 0;
  /* transform: rotate(-20deg); */
  /* display:none; */
  cursor: pointer;
}
.user-element:hover {
    box-shadow: 0px 0px 8px 0px #bbbbbb;
}
.login-box {
  position:absolute;
  width: 420px;
  height: 600px;
  left:50%;
  top: 50%;
  margin-left: -210px;
  margin-top: -300px;
  border: 1px solid #cccccc;
  border-radius: 3px;
  overflow: hidden;
  background-image: linear-gradient(to bottom right, #ffffff, #e8e8e8);
  box-shadow: 0px 0px 10px 1px #cccccc;
}

@media (max-width: 400px) {
  .login-box {
    width: 300px;
    height: 300px;
    margin-left: -150px;
    margin-top: -150px;
  }
}

@media (max-width: 300px) {
  .login-box {
    width: 200px;
    height: 200px;
    margin-left: -100px;
    margin-top: -100px;
  }
}

#nav {
  padding: 30px;
}

#nav a {
  font-weight: bold;
  color: #2c3e50;
}

#nav a.router-link-exact-active {
  color: #42b983;
}
</style>
암호 및 로그인 아이디 입력양식
단순하게 입력 양식만 출력하는 방식에서 아이콘과 입력양식이 보여지는 UI를 구성하기 위하여 별도의 입력양식 vue를 생성하였습니다.
<template>
  <div class="label-input">
    <div class="label">
      <font-awesome-icon :icon="icon" />
    </div>
    <div class="input">
      <input :type="type" :name="name" :value="value" @input="$emit('update:value', $event.target.value)" />
    </div>
  </div>
</template>

<script>
export default {
  name: 'LabelInput',
  props: {
    icon: String,
    name: String,
    type: String,
    value: String
  }
}
</script>

<style scoped>
.label-input {
  margin: 5px 10px;
  border: 1px solid #cccccc;
  border-radius: 10px;
  display: flex;
  flex-wrap: wrap;
}

.label-input .label {
  box-sizing: border-box;
  border-right: 1px solid #cccccc;
  flex-basis: 30px;
  padding: 10px;
  margin: 0;
}

.label-input svg {
  font-size: 16px;
  color: #00A1A7;
}
.label-input .input {
  box-sizing: border-box;
  height: 36px;
  padding: 0;
  text-align:left;
  flex-basis: calc(100% - 36px);
}
.label-input input {
  height: 27px;
  width: calc(100% - 15px);
  margin: 5px;
  border: 0;
  background: #ffffff;
}
</style>
로그인 테스트


최근 로그인한 사용자 저장하기
구글 로그인 페이지의 경우에는 웹브라우저에서 로그인되었던 사용자의 아이디를 출력하여 추후 로그인에 사용합니다. 본 장에서는 최근에 로그인한 사용자를 표시하도록 사용자 로그인 페이지를 수정합니다.
로그인 성공/실패 처리방식 수정
로그인 성공 및 실패 시에 Spring Security OAuth2에서는 바로 Callback 경로로 페이지를 전환하게 됩니다. 따라서, 로그인 성공 시에 별도의 로직을 추가할 수 없습니다. 사용자의 인증정보의 정합성 검증 성공/실패를 사용자 정의하여 처리하도록 AuthenticationSuccessHandler, AuthenticationFailureHandler를 재정의합니다.
본 포스트에서는 사용자 정의 로그인 페이지에서 Ajax를 통하여 로그인을 처리하도록 수정할 예정입니다. 아래와 같이 JSON코드를 반환하는 코드로 구성합니다.
import java.io.IOException;
import java.io.OutputStream;
import java.util.HashMap;
import java.util.Map;

import javax.servlet.ServletException;
import javax.servlet.http.HttpServletRequest;
import javax.servlet.http.HttpServletResponse;

import org.codehaus.jackson.map.ObjectMapper;
import org.springframework.security.core.Authentication;
import org.springframework.security.core.AuthenticationException;
import org.springframework.security.core.userdetails.UserDetails;
import org.springframework.security.web.authentication.AuthenticationFailureHandler;
import org.springframework.security.web.authentication.AuthenticationSuccessHandler;
import org.springframework.security.web.savedrequest.HttpSessionRequestCache;
import org.springframework.security.web.savedrequest.RequestCache;
import org.springframework.security.web.savedrequest.SavedRequest;

import kr.ejsoft.oauth2.server.model.OAuthUserDetails;

public class AuthenticationHandler implements AuthenticationSuccessHandler, AuthenticationFailureHandler {
	@Autowired
	@Qualifier("oauthUserDetailsService")
	private UserDetailsService userDetailsService;

	@Override
	public void onAuthenticationSuccess(HttpServletRequest request, HttpServletResponse response, Authentication authentication) throws IOException, ServletException {
		ObjectMapper om = new ObjectMapper();

		Map<String, Object> map = new HashMap<String, Object>();
		map.put("success", true);
		map.put("returnUrl", getReturnUrl(request, response));

		Object details = authentication.getPrincipal();
		if(details instanceof String) {
			UserDetails user = userDetailsService.loadUserByUsername((String) details);
			if(user != null) {
				details = user;
			}
		}
		if(details instanceof OAuthUserDetails) {
			OAuthUserDetails userDetails = (OAuthUserDetails) details;
			map.put("name", userDetails.getName());
			map.put("icon", userDetails.getIcon());
		}
		if(details instanceof UserDetails) {
			UserDetails userDetails = (UserDetails) details;
			map.put("username", userDetails.getUsername());
		}

		// {"success" : true, "returnUrl" : "..."}
		String jsonString = om.writeValueAsString(map);

		OutputStream out = response.getOutputStream();
		out.write(jsonString.getBytes());
	}

	/**
	 * 로그인 하기 전의 요청했던 URL을 알아낸다.
	 *
	 * @param request
	 * @param response
	 * @return
	 */
	private String getReturnUrl(HttpServletRequest request, HttpServletResponse response) {
		RequestCache requestCache = new HttpSessionRequestCache();
		SavedRequest savedRequest = requestCache.getRequest(request, response);
		if (savedRequest == null) {
			return request.getSession().getServletContext().getContextPath();
		}
		return savedRequest.getRedirectUrl();
	}

	@Override
	public void onAuthenticationFailure(HttpServletRequest request, HttpServletResponse response, AuthenticationException exception)
		throws IOException, ServletException {

		ObjectMapper om = new ObjectMapper();
		Map<String, Object> map = new HashMap<String, Object>();
		map.put("success", false);
		map.put("message", exception.getMessage());

		// {"success" : false, "message" : "..."}
		String jsonString = om.writeValueAsString(map);

		OutputStream out = response.getOutputStream();
		out.write(jsonString.getBytes());
	}
}
사용자 정의 성공/실패 Handler 매핑
위에서 정의한 성공/실패 Handler를 아래와 같이 사용하도록 변경합니다.
	@Bean
	public AuthenticationHandler authenticationHandler() {
		return new AuthenticationHandler();
	}

	@Override
	protected void configure(HttpSecurity http) throws Exception {
		http
			.csrf().disable()
			.authorizeRequests()
				.antMatchers("/", "/home", "/js/**", "/css/**", "/img/**", "/favicon.ico").permitAll()
				.antMatchers("/auth/**").permitAll()
				.anyRequest().authenticated()
			.and()
				.formLogin()
				.loginPage("/login").permitAll()
//				.failureUrl("/login?failure")
				.successHandler(authenticationHandler())
				.failureHandler(authenticationHandler())
			.and()
				.logout().permitAll()
			.and()
				.httpBasic()
			;
	}
사용자 정의 페이지 수정
Vue.js의 Store기능 정의
Vue.js의 store기능을 사용하여 최근 사용한 사용자를 저장하도록 구성합니다. 이 구성에서는 페이지 다시 읽기 시에도 값이 유지될 수 있도록 vuex-persistedstate를 추가로 구성하였습니다.
import Vue from 'vue'
import Vuex from 'vuex'
import createPersistedState from "vuex-persistedstate";

Vue.use(Vuex)

export default new Vuex.Store({
  state: {
    users: []
  },
  mutations: {
    addUser: function (state, payload) {
      // removeUser(state, payload);
      return state.users.unshift(payload);
    },
    removeUser: function (state, payload) {
      let index = -1;
      for(let idx = 0; idx < state.users.length; idx++) {
        const item = state.users[idx];
        if(item.userid === payload.userid) {
          index = idx;
          break;
        }
      };
      return (index >= 0) ? state.users.splice(index, 1) : state.users;
    },
  },
  actions: {
    addUser: function (context, payload) {
      this.commit("removeUser", payload);
      this.commit("addUser", payload);
    },
    removeUser: function (context, payload) {
      this.commit("removeUser", payload);
    },
  },
  modules: {
  },
  getters: {
    getUsers : function(state) {
      return state.users;
    }
  },
  plugins: [createPersistedState()]
})
사용자 정의 로그인 페이지 수정
최근에 로그인한 사용자를 표시하는 목록과 Ajax를 통하여 로그인하도록 코드를 수정합니다. (style 코드는 동일하여 생략하였습니다.)
<template>
  <div class="login-box">
    <div class="login-background"></div>
    <div class="login-contents">
      <div class="login-title">
        <img class="client-icon" :src="client.icon">
        <h1>{{ client.name }}</h1>
        <div class="login-desc">
          {{ client.desc }}
        </div>
        <div class="login-authorization">
          <span v-if="client.authorization.length > 0">요청권한 : </span>
          <span :key="auth.name" v-for="(auth, index) in client.authorization">
            <span v-if="index > 0">, {{ auth }}</span>
            <span v-else>{{ auth }}</span>
          </span>
        </div>
        <div class="login-failure" v-if="isFailurePage">
          <span>Failure : </span>
          <span>
            유효한 사용자를 찾을 수 없습니다.
          </span>
        </div>
      </div>
      <div style="position:relative;height:280px;">
      <transition name="slide-fade">
      <div class="login-form" v-if="!showInputs">
        <template v-for="(user, index) in users">
          <div :key="user.userid" v-if="index < 2 && user.userid && user.userid != ''" class="user-element" @click="showInputForm(user);">
            <img class="user-icon" :src="user.icon" v-if="user.icon && user.icon != ''">
            <img class="user-icon" src="https://cdn.patchcdn.com/assets/layout/contribute/user-default.png" v-els>
            <span>{{ user.name }}</span>
          </div>
        </template>
        <div class="user-element unlisted" @click="showInputForm(null);">
          <img class="user-icon" src="https://cdn.patchcdn.com/assets/layout/contribute/user-default.png">
          다른 id 사용
        </div>
        <div class="login-buttons">
        </div>
      </div>
      </transition>
      <transition name="slide-fade">
      <div class="login-inputs" v-if="showInputs">
        <form action="/login" method="post">
          <div v-if="selectUser != null">
            <img class="user-icon big" :src="selectUser.icon" v-if="selectUser.icon && selectUser.icon != ''">
            <img class="user-icon big" src="https://cdn.patchcdn.com/assets/layout/contribute/user-default.png" v-else>
            <input type="hidden" name="username" :value="username" />
            <br />
            {{ selectUser.name }}
            <label-input type="password" name="password" icon="unlock-alt" :value.sync="password">
              Password
            </label-input>
          </div>
          <div v-else>
            <label-input type="text" name="username" icon="user" :value.sync="username">
              User Id
            </label-input>
            <label-input type="password" name="password" icon="unlock-alt" :value.sync="password">
              Password
            </label-input>
          </div>
          <div class="login-buttons">
            <button class="button-action" @click.stop.prevent="hideInputForm();">Back</button>
            <button class="button-action" @click.stop.prevent="login();">Login</button>
          </div>
        </form>
      </div>
      </transition>
      </div>
      <div class="login-link">
        <div class="login-link-left"><router-link to="/forgot">Forgot password?</router-link></div>
        <div class="login-link-right"><router-link to="/signup">Sign up</router-link></div>
      </div>
    </div>
  </div>
</template>

<script>
import LabelInput from '@/components/LabelInput.vue'
const axios = require('axios');

export default {
  name: 'home',
  components: {
    LabelInput,
  },
  created : function() {
    let href = window.location.href;
    if(href.indexOf("?failure") >= 0) this.isFailurePage = true;
  },
  computed: {
    users : function() {
      return this.$store.getters.getUsers;
    }
  },
  data : function() {
    return {
      username : "",
      password : "",
      client: {},
      showInputs: false,
      selectUser: null,
      isFailurePage: false,
    }
  },
  methods: {
    showInputForm : function(user) {
      if(user != null) {
        this.selectUser = user;
        this.username = user.userid;
        this.password = "";
      }
      this.showInputs = true;
    },
    hideInputForm : function() {
      this.showInputs = false;
      this.selectUser = null;
      this.username = "";
      this.password = "";
    },
    load: function() {
      axios.get("/auth/client", {
        timeout: 1000
      })
      .then( res => {
        if(res.data) {
          const data = res.data;
          if(data.code == "200") {
            this.client = res.data;
          } else {
            this.client = {
              icon: "https://tistory4.daumcdn.net/tistory/3410306/attach/97e22f962436482399d633524b87a6a6",
              name : "Error",
              desc : data.message,
              authorization: []
            };
          }
        }
      })
      .catch(
          error => {
            console.log("Error : " + error);
          }
      );
    },
    login: function() {
      let form = new FormData();
      form.append('username', this.username);
      form.append('password',this.password);

      axios.post("/login", form)
      .then( res => {
        if(res.data) {
          const data = res.data;
          if(data.success == true) {
            this.isFailurePage = false;
            if(data.username && data.name) {
              const user = {
                userid : data.username,
                name : data.name,
                icon : data.icon,
              }
              this.$store.dispatch("addUser", user).then(() => {
                window.location.href = data.returnUrl;
              });
            } else {
              window.location.href = data.returnUrl;
            }
          } else {
            this.isFailurePage = true;
          }
        }
      })
      .catch(
          error => {
            console.log("Error : " + error);
          }
      );
    }
  },
  mounted : function() {
    this.load();
  }
}
</script>
로그인 테스트


글을 마치며
암호 찾기와 회원 가입 기능을 제외하고 사용자정의 로그인페이지를 구현하였습니다. 암호 찾기 기능과 회원 가입 기능은 vue-router를 통하여 별도로 구현하면 됩니다.(현재 작업 중인 페이지는 클라이언트와 사용자 관리를 관리자가 직접하므로 별도의 기능이 필요하지 않아 구현하지 않았습니다.)
참고사이트
- Creating a Custom Login Form
https://docs.spring.io/spring-security/site/docs/current/guides/html5/form-javaconfig.html - Spring Boot - (7-1) Login 성공 시점에 처리 로직 구현
https://4urdev.tistory.com/54 - Spring Boot - Spring Security + MyBatis + Vue.js (로그인 구현)
https://m.blog.naver.com/PostView.nhn?blogId=spdlqjdudghl&logNo=221353387446&proxyReferer=https%3A%2F%2Fwww.google.com%2F
소스코드
소스코드는 여기에서 다운로드 가능합니다.
'Development > Spring Framework, Security, OAuth2' 카테고리의 다른 글
| Spring Framework, Interceptor와 Filter 사용하기 (0) | 2020.02.17 |
|---|---|
| Spring Boot with OAuth2 - 10. OAuth2 Client 구현 (0) | 2019.12.23 |
| Spring Boot with OAuth2 - 8. OAuth2 Server - Client, User Cache (0) | 2019.12.03 |
| Spring Boot with OAuth2 - 7. JWT Refresh Token 관리 (0) | 2019.12.02 |
| Spring Boot with OAuth2 - 6. OAuth2 Server 접근/권한 제어 (0) | 2019.11.27 |