OAuth2 란

OAuth는 Open Authorization, Open Authentication 뜻하는 것으로 자신의 애플리케이션 서버의 데이터로 다른 Third party에게 자원을 공유하거나 대신 유저 인증을 처리해줄 수 있는 오픈 표준 프로토콜이다.
대표적인 예가 구글인증이나 페이스북인증입니다. 회원가입이나 로그인시에 구글 또는 페이스북으로 연결을 지원하는 방식입니다. 요즘에는 다양한 시스템에서 OAuth2 서비스를 제공하고 있습니다.

OAuth2 승인방식
- Authorization Code Grant Type : 권한 부여 코드 승인 타입
클라이언트가 다른 사용자 대신 특정 리소스에 접근을 요청할 때 사용됩니다. 리소스 접근을 위한 사용자 명과 비밀번호, 권한 서버에 요청해서 받은 권한 코드를 함께 활용하여 리소스에 대한 엑세스 토큰을 받는 방식입니다. 이 방식은 Refresh Token의 사용이 가능합니다.
클라이언트가 시스템 서버에 구현되어야 합니다. - Implicit Grant Type : 암시적 승인
권한 부여 코드 승인 타입과 다르게 권한 코드 교환 단계 없이 엑세스 토큰을 즉시 반환받아 이를 인증에 이용하는 방식입니다. 이 방식은 Refresh Token 을 사용할 수 없습니다.
클라이언트가 웹브라우저에서 직접 통신을하며 자바스크립트 등의 언어로 구현됩니다. - Resource Owner Password Credentials Grant Type : 리소스 소유자 암호 자격 증명 타입
클라이언트가 사용자이름과 암호를 직접 Authorization Server에 전달하여 엑세스 토큰에 대한 사용자의 자격 증명을 교환하는 방식입니다. Authorization Server의 로그인화면이 생략됩니다. 이 방식은 Refresh Token의 사용이 가능합니다.
네트워크를 통하여 사용자의 이름과 암호가 노출이 되는 방식이므로 보안프로토콜(https)를 사용하여 네트워크를 통해 중요정보가 탈취되지 않도록 해야 합니다. - Client Credentials Grant Type : 클라이언트 자격 증명 타입
클라이언트가 컨텍스트 외부에서 액세스 토큰을 얻어 특정 리소스에 접근을 요청할 때 사용하는 방식입니다.
토큰을 요청하면 인증없이 바로 액세스 토큰을 발급합니다. 인증이 없으므로 접근권한 관리에 유의하여 사용해야 합니다. 이 방식은 Refresh Token을 사용할 수 없습니다.
Authorization Code Grant Type 방식

Spring Boot 프로젝트를 신규로 생성하고 의존성을 아래와 같이 설정합니다.
Code - pom.xml
<?xml version="1.0" encoding="UTF-8"?>
<project xmlns="http://maven.apache.org/POM/4.0.0" xmlns:xsi="http://www.w3.org/2001/XMLSchema-instance"
    xsi:schemaLocation="http://maven.apache.org/POM/4.0.0 https://maven.apache.org/xsd/maven-4.0.0.xsd">
    <modelVersion>4.0.0</modelVersion>
    <parent>
        <groupId>org.springframework.boot</groupId>
        <artifactId>spring-boot-starter-parent</artifactId>
        <!-- 최신 버전은 라이브러리 참조에 오류가 있어 이전 버전으로 수정 -->
        <version>2.1.0.RELEASE</version>
        <relativePath/>
    </parent>

    <properties>
        <java.version>1.8</java.version>
        <!-- 라이브러리 참조에 오류가 있어 버전 수정 -->
        <maven-jar-plugin.version>3.1.1</maven-jar-plugin.version>
    </properties>

    <dependencies>
        <dependency>
            <groupId>org.springframework.boot</groupId>
            <artifactId>spring-boot-starter</artifactId>
        </dependency>

        <!-- OAuth 관련 라이브러리 추가 -->
        <dependency>
            <groupId>org.springframework.boot</groupId>
            <artifactId>spring-boot-starter-security</artifactId>
        </dependency>

        <dependency>
            <groupId>org.springframework.security.oauth</groupId>
            <artifactId>spring-security-oauth2</artifactId>
            <version>2.1.0.RELEASE</version>
        </dependency>

        <!-- 웹서비스를 위한 라이브러리 추가 -->
        <dependency>
            <groupId>org.springframework.boot</groupId>
            <artifactId>spring-boot-starter-web</artifactId>
        </dependency>

        <dependency>
            <groupId>org.springframework.boot</groupId>
            <artifactId>spring-boot-starter-thymeleaf</artifactId>
        </dependency>

        <dependency>
            <groupId>org.projectlombok</groupId>
            <artifactId>lombok</artifactId>
        </dependency>
</project>
Spring Security Oauth 구현을 위한 라이브러리와 웹서비스를 사용하기 위한 라이브러리 의존성을 추가합니다.
Code - Application.java
import org.slf4j.Logger;
import org.slf4j.LoggerFactory;
import org.springframework.boot.SpringApplication;
import org.springframework.boot.autoconfigure.SpringBootApplication;

@SpringBootApplication
public class Application {
    //
    private static final Logger log = LoggerFactory.getLogger(Application.class);

    public static void main(String[] args) {
        SpringApplication.run(Application.class, args);
    }
}
자동으로 생성되는 코드와 동일합니다.
Code - AuthorizationServerConfig.java
import org.springframework.beans.factory.annotation.Autowired;
import org.springframework.context.annotation.Configuration;
import org.springframework.security.authentication.AuthenticationManager;
import org.springframework.security.oauth2.config.annotation.configurers.ClientDetailsServiceConfigurer;
import org.springframework.security.oauth2.config.annotation.web.configuration.AuthorizationServerConfigurerAdapter;
import org.springframework.security.oauth2.config.annotation.web.configuration.EnableAuthorizationServer;
import org.springframework.security.oauth2.config.annotation.web.configurers.AuthorizationServerEndpointsConfigurer;

@Configuration
@EnableAuthorizationServer
public class AuthorizationServerConfig extends AuthorizationServerConfigurerAdapter {
    @Override
    public void configure(ClientDetailsServiceConfigurer clients) throws Exception {
        clients
            .inMemory()
            .withClient("client")
//            .secret("{bcrypt}$2a$10$goA9F/Q./Ml8lYvuO1tj6OKA5K6VVM/jmUcdIp1AMzqtXHsuo68/W")        // secret
            .secret("{noop}secret")        // secret
            .redirectUris("http://localhost:9000/callback")
            .authorizedGrantTypes("authorization_code")
            .scopes("read_profile");
    }
}
클라이언트 정보를 추가합니다. 클라이언트 secret는 PasswordEncoder를 사용하여 인코딩하는 것을 추천합니다. 추후 데이터베이스 등에 저장할 경우 평문보다는 암호화된 문자열을 저장합니다.
Code - ResourceServerConfig.java
import org.springframework.context.annotation.Configuration;
import org.springframework.security.config.annotation.web.builders.HttpSecurity;
import org.springframework.security.oauth2.config.annotation.web.configuration.EnableResourceServer;
import org.springframework.security.oauth2.config.annotation.web.configuration.ResourceServerConfigurerAdapter;

@Configuration
@EnableResourceServer
public class ResourceServerConfig extends ResourceServerConfigurerAdapter {
    @Override
    public void configure(HttpSecurity http) throws Exception {
        http
            .authorizeRequests().anyRequest().authenticated()
            .and()
            .requestMatchers().antMatchers("/api/**");
    }
}
자원서버의 정보를 설정합니다. /api/는 추후에 인증 후 서비스를 제공하기 위한 경로로 사용됩니다.
Code - WebSecurityConfig.java
import java.io.UnsupportedEncodingException;
import java.util.Base64;
import java.util.Base64.Encoder;

import org.slf4j.Logger;
import org.slf4j.LoggerFactory;
import org.springframework.context.annotation.Bean;
import org.springframework.context.annotation.Configuration;
import org.springframework.security.authentication.AuthenticationManager;
import org.springframework.security.config.annotation.web.builders.HttpSecurity;
import org.springframework.security.config.annotation.web.configuration.EnableWebSecurity;
import org.springframework.security.config.annotation.web.configuration.WebSecurityConfigurerAdapter;
import org.springframework.security.core.userdetails.User;
import org.springframework.security.core.userdetails.UserDetailsService;
import org.springframework.security.crypto.factory.PasswordEncoderFactories;
import org.springframework.security.crypto.password.PasswordEncoder;
import org.springframework.security.provisioning.InMemoryUserDetailsManager;

import lombok.AllArgsConstructor;

@Configuration
@EnableWebSecurity
@AllArgsConstructor
public class WebSecurityConfig extends WebSecurityConfigurerAdapter {
    //
    private static final Logger log = LoggerFactory.getLogger(WebSecurityConfig.class);

    @Override
    protected void configure(HttpSecurity http) throws Exception {
        http
            .csrf().disable()
            .authorizeRequests().anyRequest().authenticated()
            .and()
            .formLogin()
            .and()
            .httpBasic();

        makeAuthorizationRequestHeader()
    }

    @Bean
    public PasswordEncoder passwordEncoder() {
        return PasswordEncoderFactories.createDelegatingPasswordEncoder();
    }

    @Bean
    public UserDetailsService userDetailsService() {
        PasswordEncoder encoder = passwordEncoder();
        String password = encoder.encode("pass");
        log.debug("PasswordEncoder password : [{}] ", password);                    // {bcrypt}$2a$10$q6JJMlG7Q7Gt4n/76ydvp.Vk9pWVcTfCQ4NtWyBzNtWOmefYNw/wO
        log.debug("PasswordEncoder password : [{}] ", encoder.encode("secret"));                    // {bcrypt}$2a$10$goA9F/Q./Ml8lYvuO1tj6OKA5K6VVM/jmUcdIp1AMzqtXHsuo68/W

        InMemoryUserDetailsManager manager = new InMemoryUserDetailsManager();
        manager.createUser(User.withUsername("user").password(password).roles("USER").build());
        manager.createUser(User.withUsername("admin").password("{noop}pass").roles("USER", "ADMIN").build());
        return manager;
    }

    private static void makeAuthorizationRequestHeader() {
        String oauthClientId = "client";
        String oauthClientSecret = "secret";

        Encoder encoder = Base64.getEncoder();
        try {
            String toEncodeString = String.format("%s:%s", oauthClientId, oauthClientSecret);
            String authorizationRequestHeader = "Basic " + encoder.encodeToString(toEncodeString.getBytes("UTF-8"));
            log.debug("AuthorizationRequestHeader : [{}] ", authorizationRequestHeader);            // Y2xpZW50OnNlY3JldA==
        } catch (UnsupportedEncodingException e) {
            log.error(e.getMessage(), e);
        }
    }
}
클라이언트에서 사용되는 사용자의 정보를 등록합니다. 여기서는 user과 admin을 등록하였습니다.
passwordEncoder()함수와 userDetailsService() 함수에서 사용자를 등록합니다. password는 암호를 암호화하여 저장하기 위해 추가된 코드입니다. 암호화를 하지 않는다면 {noop}를 앞에 추가하여 암호화를 하지 않는다고 알려주어야 합니다. Spring Security 5.x 이상에서 PasswordEncoder 사용이 의무화되었습니다.
makeAuthorizationRequestHeader() 함수는 Restful Client에서 호출하기 위한 인증헤더를 만들어주기 위해서 삽입한 코드입니다. 실제 운영상에서는 필요없는 코드입니다.
Execute - Authorization Code Grant Type
웹브라우저에 아래의 주소를 입력합니다.
주소 이동 시 자동으로 Spring Security의 기본 인증 페이지로 리다이렉트 됩니다.

WebSecurityConfig에서 지정한 사용자 user/pass로 인증처리합니다.

클라이언트 ID client에 대한 접근을 Authorize 버튼을 눌러 승인하면 지정한 콜백주소로 코드를 반환합니다.
http://localhost:9000/callback?code=2BnEY4
반환된 권한 부여코드는 2BnEY4입니다.
POST방식으로 토큰을 요청합니다.
요청주소 : http://localhost:9090/oauth/token
요청헤더 :
Content-Type=application/x-www-form-urlencoded
Authorization: Basic Y2xpZW50OnNlY3JldA==
헤더의 Authorization 값은 makeAuthorizationRequestHeader() 함수에서 출력되는 로그를 복사하여 사용합니다.
요청내용
grant_type=authorization_code&code=2BnEY4&redirect_uri=http%3A%2F%2Flocalhost%3A9000%2Fcallback&scope=read_profile&
요청본문
POST /oauth/token HTTP/1.1
Authorization: Basic Y2xpZW50OnNlY3JldA==
Content-Type: application/x-www-form-urlencoded
User-Agent: http4e/5.0.12
Host: localhost:9090
Content-Length: 115

grant_type=authorization_code&code=2BnEY4&redirect_uri=http%3A%2F%2Flocalhost%3A9000%2Fcallback&scope=read_profile&
응답본문
HTTP/1.1 200
Pragma: no-cache
Cache-Control: no-store
X-Content-Type-Options: nosniff
X-XSS-Protection: 1; mode=block
X-Frame-Options: DENY
Content-Type: application/json;charset=UTF-8
Transfer-Encoding: chunked
Date: Mon, 18 Nov 2019 03:31:23 GMT

{"access_token":"4b3d1db4-e488-492a-8256-9643df0c4f57","token_type":"bearer","expires_in":43199,"scope":"read_profile"}
Execute - 리소스 페이지 요청
요청주소 : http://localhost:9090/api/access
요청헤더 :
Content-Type=application/x-www-form-urlencoded
Authorization: Bearer 4b3d1db4-e488-492a-8256-9643df0c4f57
Authorization Server에서 반환된 접근 토큰을 요청 헤더에 추가합니다.
요청본문
POST /api/access HTTP/1.1
Authorization: Bearer 4b3d1db4-e488-492a-8256-9643df0c4f57
Content-Type: application/x-www-form-urlencoded
User-Agent: http4e/5.0.12
Host: localhost:9090
Content-Length: 0
응답본문(접근 토큰이 유효한 경우)
HTTP/1.1 404
X-Content-Type-Options: nosniff
X-XSS-Protection: 1; mode=block
Cache-Control: no-cache, no-store, max-age=0, must-revalidate
Pragma: no-cache
Expires: 0
X-Frame-Options: DENY
Content-Type: application/json;charset=UTF-8
Transfer-Encoding: chunked
Date: Mon, 18 Nov 2019 03:54:20 GMT

{"timestamp":"2019-11-18T03:54:20.565+0000","status":404,"error":"Not Found","message":"No message available","path":"/api/access"}
- 접근이 정상적으로 처리된 경우입니다. 404오류는 요청한 페이지가 실제 존재하지 않기 때문에 발생된 오류입니다.
응답본문(접근 토큰이 유효하지 않을 경우)
HTTP/1.1 401
WWW-Authenticate: Bearer realm="oauth2-resource", error="invalid_token", error_description="Invalid access token: 4b3d1db4-e488-492a-8256-9643df0c4f571"
Pragma: no-cache
Cache-Control: no-store
X-Content-Type-Options: nosniff
X-XSS-Protection: 1; mode=block
X-Frame-Options: DENY
Content-Type: application/json;charset=UTF-8
Transfer-Encoding: chunked
Date: Mon, 18 Nov 2019 03:55:28 GMT

{"error":"invalid_token","error_description":"Invalid access token: 4b3d1db4-e488-492a-8256-9643df0c4f571"}
- 401 오류를 반환합니다. 토큰이 유효하지 않을 경우 오류를 반환합니다. (토큰의 맨뒤에 1을 추가)
Implicit Grant Type 방식

Code - AuthorizationServerConfig.java
import org.springframework.beans.factory.annotation.Autowired;
import org.springframework.context.annotation.Configuration;
import org.springframework.security.authentication.AuthenticationManager;
import org.springframework.security.oauth2.config.annotation.configurers.ClientDetailsServiceConfigurer;
import org.springframework.security.oauth2.config.annotation.web.configuration.AuthorizationServerConfigurerAdapter;
import org.springframework.security.oauth2.config.annotation.web.configuration.EnableAuthorizationServer;
import org.springframework.security.oauth2.config.annotation.web.configurers.AuthorizationServerEndpointsConfigurer;

@Configuration
@EnableAuthorizationServer
public class AuthorizationServerConfig extends AuthorizationServerConfigurerAdapter {
    @Override
    public void configure(ClientDetailsServiceConfigurer clients) throws Exception {
        clients
            .inMemory()
            .withClient("client")
//            .secret("{bcrypt}$2a$10$goA9F/Q./Ml8lYvuO1tj6OKA5K6VVM/jmUcdIp1AMzqtXHsuo68/W")        // secret
            .secret("{noop}secret")        // secret
            .redirectUris("http://localhost:9000/callback")
            .authorizedGrantTypes("authorization_code", "implicit")		// "implicit" 추가
            .scopes("read_profile");
    }
}
Execute - Implicit Grant Type
웹브라우저에 아래의 주소를 입력합니다.
주소 이동 시 자동으로 Spring Security의 기본 인증 페이지로 리다이렉트 됩니다.
WebSecurityConfig에서 지정한 사용자 user/pass로 인증처리합니다.
Authorize 버튼을 클릭하면 바로 접근 토근이 콜백주소로 바로 반환됩니다.
Resource Owner Password Credentials Grant 방식

Code - AuthorizationServerConfig.java
import org.springframework.beans.factory.annotation.Autowired;
import org.springframework.context.annotation.Configuration;
import org.springframework.security.authentication.AuthenticationManager;
import org.springframework.security.oauth2.config.annotation.configurers.ClientDetailsServiceConfigurer;
import org.springframework.security.oauth2.config.annotation.web.configuration.AuthorizationServerConfigurerAdapter;
import org.springframework.security.oauth2.config.annotation.web.configuration.EnableAuthorizationServer;
import org.springframework.security.oauth2.config.annotation.web.configurers.AuthorizationServerEndpointsConfigurer;

@Configuration
@EnableAuthorizationServer
public class AuthorizationServerConfig extends AuthorizationServerConfigurerAdapter {
    // AuthenticationManager 인스턴스 설정
    /**
     * Inject the authenticationManager to support password grant type
     */
    @Autowired
    private AuthenticationManager authenticationManager;

    @Override
    public void configure(AuthorizationServerEndpointsConfigurer endpoints) throws Exception {
        endpoints.authenticationManager(authenticationManager);
    }

    @Override
    public void configure(ClientDetailsServiceConfigurer clients) throws Exception {
        clients
            .inMemory()
            .withClient("client")
//            .secret("{bcrypt}$2a$10$goA9F/Q./Ml8lYvuO1tj6OKA5K6VVM/jmUcdIp1AMzqtXHsuo68/W")        // secret
            .secret("{noop}secret")        // secret
            .redirectUris("http://localhost:9000/callback")
            .authorizedGrantTypes("authorization_code", "implicit", "password")		// "password" 추가
            .scopes("read_profile");
    }
}
Code - WebSecurityConfig.java
@Configuration
@EnableWebSecurity
@AllArgsConstructor
public class WebSecurityConfig extends WebSecurityConfigurerAdapter {
    // 맨 하단에 AuthenticationManager Bean 추가

    /**
     * Need to configure this support password mode support password grant type
     *
     * @return
     * @throws Exception
     */
    @Override
    @Bean
    public AuthenticationManager authenticationManagerBean() throws Exception {
        return super.authenticationManagerBean();
    }
}
Resource Owner Password Credentials Grant 방식을 사용하기 위해서는 AuthenticationManager에 의존성주입을 설정해야 합니다.
Execute - Resource Owner Password Credentials Grant
POST방식으로 토큰을 요청합니다.
요청주소 : http://localhost:9090/oauth/token
요청헤더 :
Content-Type=application/x-www-form-urlencoded
Authorization: Basic Y2xpZW50OnNlY3JldA==
헤더의 Authorization 값은 makeAuthorizationRequestHeader() 함수에서 출력되는 로그를 복사하여 사용합니다.
요청내용
grant_type=password&username=user&password=pass&scope=read_profile&
요청본문
POST /oauth/token HTTP/1.1
Authorization: Basic Y2xpZW50OnNlY3JldA==
Content-Type: application/x-www-form-urlencoded
User-Agent: http4e/5.0.12
Host: localhost:9090
Content-Length: 67

username=user&password=pass&grant_type=password&scope=read_profile&
응답본문
HTTP/1.1 200
Pragma: no-cache
Cache-Control: no-store
X-Content-Type-Options: nosniff
X-XSS-Protection: 1; mode=block
X-Frame-Options: DENY
Content-Type: application/json;charset=UTF-8
Transfer-Encoding: chunked
Date: Mon, 18 Nov 2019 04:02:31 GMT

{"access_token":"4b3d1db4-e488-492a-8256-9643df0c4f57","token_type":"bearer","expires_in":41332,"scope":"read_profile"}
사용자의 이름과 암호를 Authorization에 전달하면 응답으로 접근 토큰이 바로 반환됩니다.
응답본문(AuthorizationManager에 의존성 주입을 하지 않았을 경우)
HTTP/1.1 400
Pragma: no-cache
Cache-Control: no-store
X-Content-Type-Options: nosniff
X-XSS-Protection: 1; mode=block
X-Frame-Options: DENY
Content-Type: application/json;charset=UTF-8
Transfer-Encoding: chunked
Date: Mon, 18 Nov 2019 04:08:46 GMT
Connection: close

{"error":"unsupported_grant_type","error_description":"Unsupported grant type: password"}
AuthorizationManager에 의존성 주입을 하지 않았을 경우 unsupported_grant_type 오류를 반환합니다.
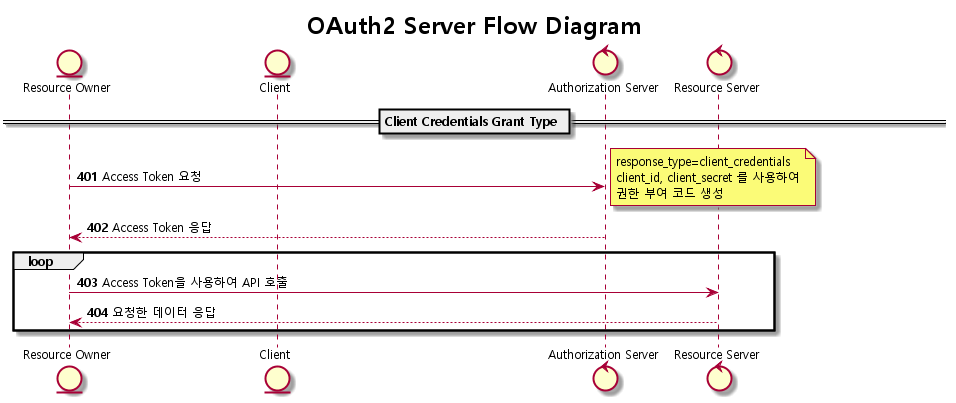
Client Credentials Grant Type 방식
Code - AuthorizationServerConfig.java
import org.springframework.beans.factory.annotation.Autowired;
import org.springframework.context.annotation.Configuration;
import org.springframework.security.authentication.AuthenticationManager;
import org.springframework.security.oauth2.config.annotation.configurers.ClientDetailsServiceConfigurer;
import org.springframework.security.oauth2.config.annotation.web.configuration.AuthorizationServerConfigurerAdapter;
import org.springframework.security.oauth2.config.annotation.web.configuration.EnableAuthorizationServer;
import org.springframework.security.oauth2.config.annotation.web.configurers.AuthorizationServerEndpointsConfigurer;

@Configuration
@EnableAuthorizationServer
public class AuthorizationServerConfig extends AuthorizationServerConfigurerAdapter {
    @Override
    public void configure(ClientDetailsServiceConfigurer clients) throws Exception {
        clients
            .inMemory()
            .withClient("client")
//            .secret("{bcrypt}$2a$10$goA9F/Q./Ml8lYvuO1tj6OKA5K6VVM/jmUcdIp1AMzqtXHsuo68/W")        // secret
            .secret("{noop}secret")        // secret
            .redirectUris("http://localhost:9000/callback")
            .authorizedGrantTypes("authorization_code", "implicit", "password", "client_credentials")		// "client_credentials" 추가
            .accessTokenValiditySeconds(120)
            .refreshTokenValiditySeconds(240)
            .scopes("read_profile");
    }
}
Execute - Implicit Grant Type
POST방식으로 토큰을 요청합니다.
요청주소 : http://localhost:9090/oauth/token
요청헤더 :
Content-Type=application/x-www-form-urlencoded
Authorization: Basic Y2xpZW50OnNlY3JldA==
헤더의 Authorization 값은 makeAuthorizationRequestHeader() 함수에서 출력되는 로그를 복사하여 사용합니다.
요청내용
grant_type=client_credentials&scope=read_profile&
요청본문
POST /oauth/token HTTP/1.1
Authorization: Basic Y2xpZW50OnNlY3JldA==
Content-Type: application/x-www-form-urlencoded
User-Agent: http4e/5.0.12
Host: localhost:9090
Content-Length: 49

grant_type=client_credentials&scope=read_profile&
응답본문
HTTP/1.1 200
Pragma: no-cache
Cache-Control: no-store
X-Content-Type-Options: nosniff
X-XSS-Protection: 1; mode=block
X-Frame-Options: DENY
Content-Type: application/json;charset=UTF-8
Transfer-Encoding: chunked
Date: Mon, 18 Nov 2019 04:19:07 GMT

{"access_token":"f3e55eec-cb69-4b17-950f-ff1a38fe15e1","token_type":"bearer","expires_in":43199,"scope":"read_profile"}
접근토큰을 Authorization에 요청하면 응답으로 접근 토큰이 반환됩니다.
Refresh Token
Access Token이 만료되었을 경우 클라이언트는 Refresh Token을 통하여 신규 Access Token을 발급합니다. 사용자는 Access Token이 만료되어도 Refresh Token을 통하여 신규 Access Token을 갱신합니다.
아래의 예제는 간단하게 만료를 확인하기 위하여 작은 숫자를 지정하였습니다. 실제 사용시 적절한 값으로 변경하여 사용해야 합니다.
Code - AuthorizationServerConfig.java
import org.springframework.beans.factory.annotation.Autowired;
import org.springframework.context.annotation.Configuration;
import org.springframework.security.authentication.AuthenticationManager;
import org.springframework.security.oauth2.config.annotation.configurers.ClientDetailsServiceConfigurer;
import org.springframework.security.oauth2.config.annotation.web.configuration.AuthorizationServerConfigurerAdapter;
import org.springframework.security.oauth2.config.annotation.web.configuration.EnableAuthorizationServer;
import org.springframework.security.oauth2.config.annotation.web.configurers.AuthorizationServerEndpointsConfigurer;

@Configuration
@EnableAuthorizationServer
public class AuthorizationServerConfig extends AuthorizationServerConfigurerAdapter {
    /**
     * Inject the authenticationManager to support password grant type
     */
    @Autowired
    private AuthenticationManager authenticationManager;

    @Autowired
    @Qualifier("userDetailsService")
    private UserDetailsService userDetailsService;

    @Override
    public void configure(AuthorizationServerEndpointsConfigurer endpoints) throws Exception {
        endpoints
            .authenticationManager(authenticationManager)
            .userDetailsService(userDetailsService);
    }

    @Override
    public void configure(ClientDetailsServiceConfigurer clients) throws Exception {
        clients
            .inMemory()
            .withClient("client")
//            .secret("{bcrypt}$2a$10$goA9F/Q./Ml8lYvuO1tj6OKA5K6VVM/jmUcdIp1AMzqtXHsuo68/W")        // secret
            .secret("{noop}secret")        // secret
            .redirectUris("http://localhost:9000/callback")
            .authorizedGrantTypes("authorization_code", "implicit", "password", "client_credentials", "refresh_token")		// "refresh_token" 추가
            .accessTokenValiditySeconds(120)
            .refreshTokenValiditySeconds(240)
            .scopes("read_profile");
    }
}
UserDetailsService의 인스턴스를 의존성 주입을 추가합니다. 추가하지 않을 경우 500 응답 에러가 발생하며 UserDetailsService 가 필요하다는 메시지를 출력합니다.
Execute - Refresh Token
Resource Owner Password Credentials Grant방식으로 토큰을 요청합니다.
요청본문
POST /oauth/token HTTP/1.1
Authorization: Basic Y2xpZW50OnNlY3JldA==
Content-Type: application/x-www-form-urlencoded
User-Agent: http4e/5.0.12
Host: localhost:9090
Content-Length: 67

grant_type=password&username=user&password=pass&scope=read_profile&
응답본문
HTTP/1.1 200
Pragma: no-cache
Cache-Control: no-store
X-Content-Type-Options: nosniff
X-XSS-Protection: 1; mode=block
X-Frame-Options: DENY
Content-Type: application/json;charset=UTF-8
Transfer-Encoding: chunked
Date: Mon, 18 Nov 2019 04:30:41 GMT

{"access_token":"fb672c89-1676-413a-a89e-a2107fed4079","token_type":"bearer","refresh_token":"1ecc0a05-3688-4b84-ac2d-88c992118621","expires_in":119,"scope":"read_profile"}
접근 토큰 응답값에 refresh_token속성이 추가되었습니다.
접근토큰이 만료되면 refresh_token을 사용하여 사용자의 재인증없이 접근토큰을 연장할 수 있습니다.
Execute - Refresh Token 사용
POST방식으로 토큰을 요청합니다.
요청주소 : http://localhost:9090/oauth/token
요청헤더 :
Content-Type=application/x-www-form-urlencoded
Authorization: Basic Y2xpZW50OnNlY3JldA==
헤더의 Authorization 값은 makeAuthorizationRequestHeader() 함수에서 출력되는 로그를 복사하여 사용합니다.
요청내용
grant_type=refresh_token&scope=read_profile&refresh_token=1ecc0a05-3688-4b84-ac2d-88c992118621&
요청본문
POST /oauth/token HTTP/1.1
Authorization: Basic Y2xpZW50OnNlY3JldA==
Content-Type: application/x-www-form-urlencoded
User-Agent: http4e/5.0.12
Host: localhost:9090
Content-Length: 95

grant_type=refresh_token&scope=read_profile&refresh_token=1ecc0a05-3688-4b84-ac2d-88c992118621&
응답본문
HTTP/1.1 200
Pragma: no-cache
Cache-Control: no-store
X-Content-Type-Options: nosniff
X-XSS-Protection: 1; mode=block
X-Frame-Options: DENY
Content-Type: application/json;charset=UTF-8
Transfer-Encoding: chunked
Date: Mon, 18 Nov 2019 04:44:47 GMT

{"access_token":"975c6c1d-05ea-4a0b-af3a-f081f2d61793","token_type":"bearer","refresh_token":"1ecc0a05-3688-4b84-ac2d-88c992118621","expires_in":120,"scope":"read_profile"}
접근토큰을 Authorization에 요청하면 응답으로 접근 토큰이 재생성되어 반환됩니다.
Refresh Token을 받을 수 있는 타입은 Authorization Code Grant, Resource Owner Password Credentials Grant입니다. 그 이외에는 Refresh Token을 넘겨주지 않습니다.
OAuth2 참고
소스코드
소스코드는 여기에서 다운로드 가능합니다.
'Development > Spring Framework, Security, OAuth2' 카테고리의 다른 글
| Spring Boot with OAuth2 - 6. OAuth2 Server 접근/권한 제어 (0) | 2019.11.27 |
|---|---|
| Spring Boot with OAuth2 - 5. OAuth2 Resource Server 분리 (0) | 2019.11.27 |
| Spring Boot with OAuth2 - 4. OAuth2 Server 확장 3 - JwtTokenStore (0) | 2019.11.26 |
| Spring Boot with OAuth2 - 3. OAuth2 Server 확장 2 - MyBatis + MariaDB 연결 (0) | 2019.11.21 |
| Spring Boot with OAuth2 - 2. OAuth2 Server 확장 1 - Hibernate + MariaDB 연결 (0) | 2019.11.20 |